
Kids Craft: Paste Batik

Those gorgeous batik prints are hard to ignore every time I walk by them at the fabric store. I wanted to make something like that with my 5¾ year old Ana.
Initially I was toying with wax-resist like I've done before. Rather than wax, I wanted something that can be made easily at home. (Washable) Glue batik seems popular for kids activity as it can be just washed off. But, rather than buying bottles and bottles of glue as for this project I had in mind, I settled on Paste Batik technique.
As Edward Teller noted, "No endeavor that is worthwhile is simple in prospect; if it is right, it will be simple in retrospect."
Not that this was such a great endeavor for me, but, it sure must've seemed like it to Ana: Making a Happy Birthday Flag which we can put up at home for birthdays!
Fortunately, thanks to her teacher, Ana and her friends had worked on this technique a couple of years ago when they made a lovely flag for the school's annual Spring Auction. So, she knew what to expect and was excited about it.
Items Used: Plain white muslin cloth, scissors, all purpose flour, water, acrylic paints in various colors, paint brush, mustard/ketchup dispenser, iron
- We noted how many letters there were in "Happy Birthday" (13), and cut out as many plain white muslin cloth into about 9½ x 9½ inch squares - I used a 9½ x 9½ inch quilt square I had, but, any size would be fine. (We cut out a few extras to a total of 16 squares). I wanted the unbleached muslin, but, Ana chose the bleached white ones. Which is fine.
- We made the paste: 1 cup (plus a few tablespoons) of all purpose or wheat flour plus 1 cup water. That's it. Add the water a little at a time, stirring constantly to remove lumps. The paste has the consistency of a slightly thick-ish crepe batter. Pour it into either an old mustard/ketchup dispenser or icing tube for easy dispensing. (This mustard dispenser is a favorite much-used tool for various activities at home, including making Roti Jala)

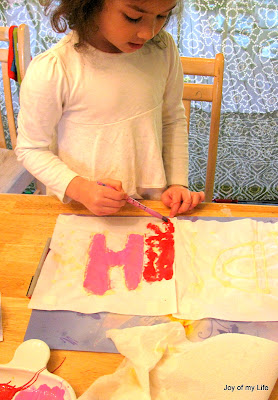
- Squirt/squeeze the mustard bottle to make patterns as needed on the fabric. We wrote one letter per square piece of fabric to make up "Happy Birthday", and added some squiggles and swirls and dots for decoration.

- Allow the paste to dry completely. We left it overnight by the heating vent, and hung it up on a clothesline indoors all day, for a total of 24 hours.
- Working with one square piece at a time, scrunch the fabric a bit to crack up the dried paste. These cracks are where the colors can sneak in and create that beautiful batik print. Then, paint any combination of favorite colors using acrylic paint. Dilute the paint with a drop or two of water to help it flow smoothly. Paint all over the fabric, on top of the dried paste, as the paint will be resisted (masked off) by the paste anyway.
- Allow the painted squares to dry completely. Again, we left it by the heating vent overnight and hung it up for drying off all next day.
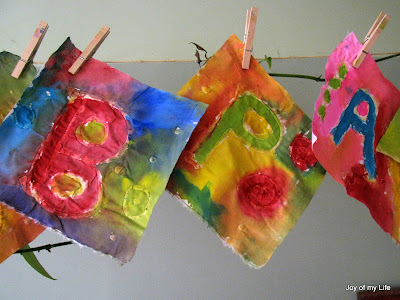
- Scrunch the now colorful fabric squares to loosen and lift off the dried paste. And start picking and peeling it off. This is the part Ana didn't enjoy, naturally. But, it has a certain monotony and rhythm to it. Make sure all the dried paste is off the fabric to reveal the beautiful print. The dried bits can be used for mosaic and collage projects.

- Heat set the paint: using medium high setting, iron the fabric squares using parchment paper or even a thin old napkin to protect the iron.

- Wash the fabric. Since I had only 13 small squares, I hand-washed them as I wasn't sure if any paint will rub off on the clothes if I washed it with a full load of laundry. Can zigzag the edges before washing to prevent excessive fraying. But, I washed first for that rustic unfinished look. Dry the fabric. This time I dried them in the dryer on low heat setting. Muslin will shrink. And it did - close to about ¾ inches all around.

- When dry, iron it flat on medium heat setting. Finish the edges. Can simply zigzag, or use piping. Voilà! The gorgeous home-made flag pieces are ready.

- I was debating sewing them together to make it easier for hanging up each time. But, decided to keep them separate. This way we could rearrange the letters any time and make up new words.
We simply used a clothespin to put it up as decoration for D's birthday recently.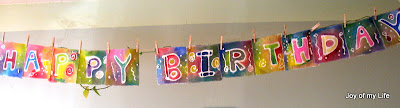


Of course, we cannot stop with just the flags, so, some potholders, coasters, place mats got made as well.
Labels: arts and crafts, fabric craft, paste-batik
posted by Sheela
8 comments
![]()
![]()

8 Comments:
Wow, its just awesome and takes lot of effort and patience at some stages especially drying one.
The end result is just worth all the effort.
It is fabulous Sheela ...as Vibha pointed out, it takes so much effort, interest and patience to create these beautiful works of art. Once again, very inspiring :-)
Thanks Vibha, Ranjani! Yeah, waiting for it to dry completely between stages was the only tough part. The rest is pretty much effortless :)
I liked that it is easy enough for Ana to do and she is in the process of adding it to some her plain clothes - t-shirts especially.
Planning to do this activity with Raghav and Medha today. Can you please share the pictures of coasters, place mats and pot holders as well.
Will let you know the end result of this activity.
Vibha:: Wonderful! Will share pics soon... hopefully this weekend... either as a separate post or will email you.
Thanks Sheela. Will send you the pics of what we made here.
Vibha:: here it is, just for you:
http://rarelythere.blogspot.com/2011/03/sewing-paste-batik-pot-holders-coasters.html"
I just followed your tutorial with my 20 month old and he absolutely loved it--despite being a super grouch today! Thanks so much! I've linked to your tutorial on my blog. :) http://www.ourmijos.com/2013/04/24/our-art-project-for-the-nursery/
Post a Comment
<< Home